Battery switch on travel trailer function is crucial for managing your RV’s power. Understanding how to use your battery switch safely and effectively is key to enjoying worry-free off-grid adventures. This guide covers various switch types, operation procedures, troubleshooting tips, and important safety precautions to keep your travel trailer running smoothly.
We’ll explore different battery switch types, from simple single-pole switches to more complex setups managing multiple battery banks. Learn how to safely switch between batteries, diagnose common problems like corrosion, and integrate your switch with other power systems like solar panels and inverters. We’ll even show you how to properly install and maintain your switch to maximize its lifespan.
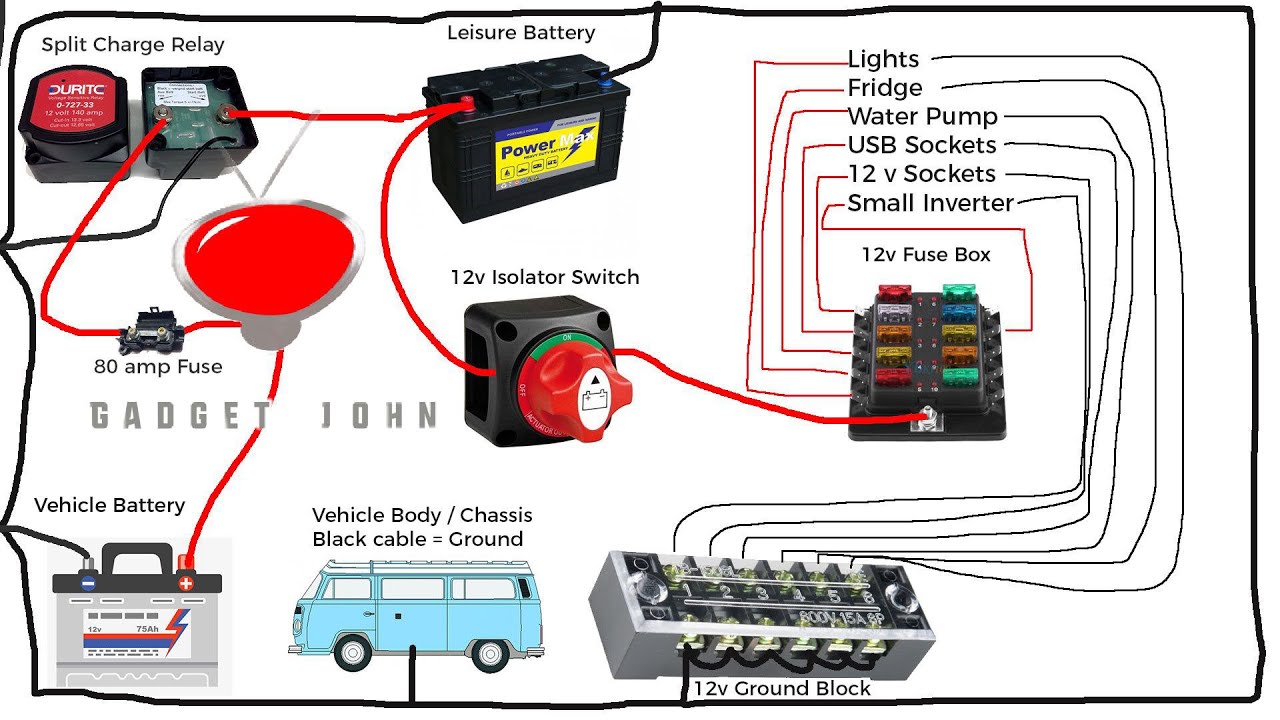
Battery Switch Types in Travel Trailers

Choosing the right battery switch for your travel trailer is crucial for managing your power sources and preventing electrical issues. Understanding the different types available will help you make an informed decision based on your specific needs and setup. This section will detail the common types, their functionalities, and their pros and cons.
Single-Pole Battery Switches
A single-pole battery switch is the simplest type. It controls only one battery’s connection to the trailer’s electrical system. This means you can only isolate one battery at a time. This is suitable for trailers with a single battery, or for situations where you only need to disconnect one battery (like during storage). Think of it as a simple on/off switch for your battery.
Double-Pole Battery Switches, Battery switch on travel trailer function
Double-pole switches offer more control, allowing you to isolate two batteries independently. Each battery has its own switch, enabling you to disconnect either battery without affecting the other. This is commonly used in trailers with dual batteries (one for house power and one for starting the tow vehicle, for instance). This setup is more versatile and safer than using a single-pole switch in a dual-battery setup.
Double-Pole, Double-Throw (DPDT) Battery Switches
DPDT switches are more complex. They allow you to switch between two batteries, or to isolate both batteries completely. This provides the most control and flexibility. You can select either battery to power the trailer, switch between them, or disconnect both entirely. This is a preferred choice for those wanting the ultimate control over their power systems, particularly useful in situations requiring independent control over two separate battery banks for different systems within the trailer.
Comparison of Battery Switch Types
| Switch Type | Functionality | Installation Complexity | Cost |
|---|---|---|---|
| Single-Pole | Controls one battery | Low | Low |
| Double-Pole | Controls two batteries independently | Medium | Medium |
| Double-Pole, Double-Throw (DPDT) | Selects between two batteries or isolates both | High | High |
Troubleshooting Common Battery Switch Issues
Your travel trailer’s battery switch is a crucial component, ensuring you can easily manage power to your house batteries and accessories. Problems with this switch can leave you stranded without lights, refrigeration, or other essential systems. Understanding common issues and how to troubleshoot them is vital for a smooth camping experience.
Corrosion on Battery Switch Terminals
Corrosion is a frequent culprit behind battery switch malfunctions. Over time, moisture and chemical reactions can build up on the terminals, creating a resistive layer that prevents proper electrical connection. This leads to reduced power flow, intermittent operation, or complete failure of the switch. To diagnose this, visually inspect the terminals. Look for white, green, or blue powdery deposits.
If present, corrosion is likely the problem. To resolve this, you’ll need to carefully clean the terminals using a wire brush or sandpaper, ensuring all corrosion is removed. Apply a corrosion inhibitor, such as dielectric grease, to prevent future corrosion. Remember to disconnect the battery negative terminal before cleaning to prevent accidental shorts.
Loose Connections at the Battery Switch
Loose connections, like corrosion, impede the flow of electricity. Vibrations during travel can loosen the bolts or nuts securing the wires to the battery switch terminals. This can lead to intermittent power, flickering lights, or complete power loss. To check for loose connections, carefully examine the bolts and nuts attaching the wires to the switch. Tighten any loose connections using the appropriate size wrench.
If the wires themselves are loose or damaged, they should be replaced.
Faulty Battery Switch
Sometimes, the problem lies within the switch itself. Internal components can fail due to age, wear, or excessive current draw. This will usually manifest as a complete inability to switch power on or off, or an intermittent connection that is unreliable. A multimeter can be used to test the continuity of the switch in the “on” and “off” positions.
If the switch doesn’t show the expected continuity, it’s likely faulty and needs replacement. Remember to consult your trailer’s wiring diagram before attempting any repairs.
Tools Needed for Troubleshooting and Repair
Troubleshooting and repairing battery switch issues requires a few basic tools. Having these on hand will make the process much smoother.
- Wire brush or sandpaper
- Wrench (appropriate size for terminal bolts)
- Dielectric grease
- Multimeter
- Screwdrivers (Phillips and flathead)
- Safety glasses
- Work gloves
Safety Considerations with Battery Switches
Working with the electrical systems in your travel trailer, especially the battery switch, requires caution. Improper handling can lead to serious injury or damage to your trailer. Understanding the potential hazards and following safety procedures is crucial for a safe and enjoyable RV experience.Properly operating and maintaining your battery switch is essential for preventing accidents and ensuring the longevity of your RV’s electrical system.
Neglecting safety precautions can result in electrical shocks, fires, and damage to your batteries and other components. This section Artikels key safety measures to keep you and your trailer safe.
Okay, so you’re wondering about your travel trailer’s battery? Totally get it. Understanding how that battery switch works is key to keeping your lights on and your fridge cold. Check out this super helpful guide on the battery switch on travel trailer function to learn the basics. Then, if you need a more in-depth look at troubleshooting, this other resource on the battery switch on travel trailer function will walk you through common problems and solutions.
Knowing your battery system is a game-changer for happy RVing!
Disconnecting Power Before Working on the Electrical System
Before performing any work on your travel trailer’s electrical system, including the battery switch, always disconnect the power completely. This involves turning off the main breaker or disconnecting the shore power cord. Never assume the power is off; always double-check. Visually inspect the breaker to confirm it’s in the “off” position and, if using shore power, unplug the cord from both the trailer and the power source.
This simple step prevents accidental shocks and short circuits.
Okay, so you’re wondering about your travel trailer’s battery, right? Understanding how the battery switch works is key to keeping your lights on and your fridge cold. Check out this helpful guide on the battery switch on travel trailer function to learn the basics. It’s super important to know how to properly manage your power, especially if you’re off-grid.
For a more detailed explanation, including troubleshooting tips, this other resource on the battery switch on travel trailer function is worth a look. Knowing your battery system is crucial for a smooth and enjoyable camping trip!
Hazards Associated with Improper Battery Switch Operation
Improper battery switch operation can lead to several hazards. For instance, failing to turn off the switch before working on the battery system can result in accidental shocks or sparks that could ignite flammable materials near the battery. Similarly, leaving the switch on while the batteries are not properly connected can lead to a drain on the battery, potentially causing damage or preventing the trailer from starting.
Furthermore, incorrect wiring or maintenance of the switch itself can create short circuits, leading to overheating and potential fires.
Safety Guidelines for Battery Switches
It’s vital to follow these safety guidelines to minimize risks:
- Always wear appropriate safety gear, including safety glasses and gloves, when working with batteries and the battery switch.
- Ensure adequate ventilation when working near batteries, as they release hydrogen gas, which is highly flammable.
- Never touch the battery terminals while the switch is on. Always turn the switch off and wait several minutes before touching any component of the electrical system.
- Regularly inspect the battery switch for corrosion, loose connections, or damage. Replace or repair any faulty components immediately.
- Use insulated tools when working with the battery switch to avoid accidental shocks.
- Keep a fire extinguisher rated for electrical fires nearby when working on the electrical system.
- If you are unsure about any aspect of working with your battery switch, consult a qualified RV technician.
Battery Switch Selection and Installation: Battery Switch On Travel Trailer Function
Choosing and installing the right battery switch is crucial for reliable power management in your travel trailer. A poorly chosen or incorrectly installed switch can lead to electrical problems, potentially damaging your batteries or other components. This section will guide you through selecting the appropriate switch and installing it safely and effectively.Selecting the correct battery switch involves considering several key factors to ensure it meets your travel trailer’s specific needs and prevents any potential issues.
Battery Switch Selection Factors
Several factors influence the selection of a suitable battery switch for your travel trailer. These include the amperage rating, the number of batteries, and the type of battery system. Overlooking these factors can lead to a switch that’s either inadequate or unnecessarily oversized.
- Amperage Rating: The switch’s amperage rating must exceed the maximum current draw of your appliances and charging systems. Underestimating this can lead to overheating and potential fire hazards. For example, a system with a high-powered inverter and multiple appliances might require a 200-amp switch, while a smaller system could suffice with a 100-amp switch. Always consult your system’s specifications to determine the appropriate amperage.
- Number of Batteries: The number of batteries you have directly impacts the switch you need. A single battery setup only requires a single-pole, double-throw (SPDT) switch, while multiple batteries might need a more complex setup, potentially involving multiple switches or a more sophisticated battery management system. Consider the number of battery banks and their individual amperage ratings.
- Battery Type: While less directly impactful on the switch itself, the type of battery (flooded lead-acid, AGM, lithium) influences the overall system design and thus indirectly impacts the switch selection. For instance, lithium batteries often require more sophisticated battery management systems that may include specific switching components.
Battery Switch Installation Steps
Correct installation is as important as choosing the right switch. Incorrect wiring can lead to short circuits and damage to your electrical system. Follow these steps carefully, and always disconnect the battery before working on any electrical components.
- Preparation: Gather your tools (wire strippers, crimpers, torque wrench, etc.), the new battery switch, appropriate gauge wiring, and any necessary mounting hardware. Consult the switch’s instructions for specific requirements.
- Mounting: Securely mount the switch in a readily accessible, well-ventilated location, protected from the elements. Use appropriate fasteners and ensure the switch is firmly attached.
- Wiring: Connect the positive (+) cables from each battery to the appropriate terminals on the switch. Use appropriately sized wire lugs and crimp them securely onto the wires. Then connect the positive cable from the load (your appliances and other devices) to the output terminal of the switch. Similarly, connect the negative (-) cables. Refer to the wiring diagram included with your specific battery switch.
- Torque Specifications: Tighten all connections according to the manufacturer’s torque specifications. Using a torque wrench prevents over-tightening, which can damage wires or terminals. Under-tightening can result in loose connections and potential overheating.
- Testing: Once installed, carefully test the switch to ensure it functions correctly. Verify that turning the switch on and off connects and disconnects power to the load appropriately.
Properly Installed Battery Switch Visual Description
A properly installed battery switch should be securely mounted in a dry, easily accessible location, away from any potential sources of damage or moisture. The wiring should be neatly routed and secured using cable ties or clamps to prevent chafing or accidental disconnection. All wire connections should be clean, properly crimped, and tightened to the manufacturer’s specified torque.
The switch should be clearly labeled to indicate its function and the connection points for the batteries and the load. The entire installation should appear professional and well-organized. The positive (+) and negative (-) connections should be clearly identified, often through color-coding (red for positive, black for negative) and/or clear labeling. The use of heat shrink tubing on the wire connections is also recommended to protect them from moisture and abrasion.
Maintenance of Travel Trailer Battery Switches
Keeping your travel trailer’s battery switch in top condition is crucial for reliable power and preventing costly repairs down the road. Regular maintenance ensures your batteries are properly connected and protected, maximizing their lifespan and minimizing the risk of electrical problems while you’re on the road. Neglecting maintenance can lead to corrosion, poor connections, and even potential fire hazards.Regular maintenance involves a simple but effective schedule of inspections and cleaning.
This proactive approach will save you time and money in the long run, ensuring your power system is ready for your next adventure.
Regular Maintenance Schedule
A good rule of thumb is to inspect your battery switch at least every three months, or more frequently if you’re using your travel trailer often or if it’s stored in a humid environment. This inspection should include a visual check for corrosion, loose connections, and any signs of damage. Cleaning should be done as needed, typically at least once a year or whenever corrosion is visible.
More frequent cleaning might be necessary in particularly harsh environments.
Preventative Measures to Extend Lifespan
Several steps can significantly extend the life of your battery switch. Protecting it from the elements is paramount. Consider using a waterproof cover or installing the switch in a well-protected location within your trailer. Regularly applying a corrosion inhibitor, such as dielectric grease, to the terminals and connections will help prevent corrosion buildup. This grease creates a barrier that keeps moisture and contaminants away from the metal surfaces, ensuring a clean and efficient connection.
Finally, ensuring your battery cables are properly sized and securely fastened will reduce stress on the switch and connections.
Identifying Signs of Wear and Tear or Impending Failure
Recognizing the warning signs of a failing battery switch is crucial for preventing unexpected power outages. Look for visible signs of corrosion, particularly white, green, or blue deposits around the terminals. These indicate a chemical reaction between the metal and the environment, degrading the connection and potentially leading to overheating or failure. Loose connections, where the cables are not firmly attached to the terminals, are another clear indication of a problem.
These loose connections can cause intermittent power or even complete power loss. Additionally, if you notice any unusual burning smells or hear crackling sounds coming from the switch, immediately disconnect the batteries and have the switch inspected by a qualified technician. These signs indicate a serious problem that could lead to a fire.
Mastering your travel trailer’s battery switch is a significant step towards confident RV ownership. By understanding its function, performing regular maintenance, and knowing how to troubleshoot common issues, you’ll ensure reliable power for all your adventures. Remember, safety is paramount; always disconnect power before working on any electrical components. Happy travels!
Answers to Common Questions
What size battery switch do I need?
The amperage rating of your battery switch should match or exceed the total amperage draw of your batteries and connected appliances. Check your battery and appliance specifications to determine the correct size.
How often should I clean my battery switch?
Inspect your battery switch at least twice a year, and clean it more frequently if you notice corrosion or dirt buildup. Regular cleaning prevents performance issues and extends the lifespan of the switch.
What should I do if my battery switch is not working?
First, check for loose connections or corrosion. If the problem persists, you may need to replace the switch or consult a qualified RV technician.
Can I use a battery switch with solar panels?
Yes, many RV owners successfully integrate battery switches into their solar power systems. However, proper wiring and configuration are crucial for safe and efficient operation. Consult a qualified electrician if you’re unsure.
